SKIP TO CONTENT

Activity

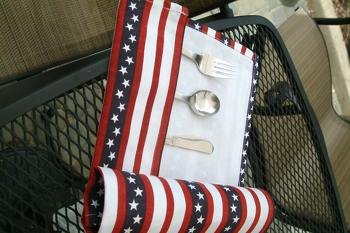
4th of July Picnic Caddy

What You Need:

  • 3 clean, empty 15 oz. tin cans (such as those used for tomato sauce), with the tops removed (Make sure the cans' edges are smooth, not jagged, to avoid cuts.)
  • 1 empty cardboard cereal box (an 18 oz. cereal box works best)
  • 2 pieces of corrugated cardboard, cut to approximately 9"x6" (Size may vary slightly depending on the size of your cereal box.)
  • 2 rolls of “contact” vinyl paper in red, white, and blue (You can use solid blue plus red and white stripes.)
  • Shiny silver stickers (tars or other various shapes if you prefer)
  • Glue gun
  • Glue stick
  • Scissors
  • Ruler

What You Do:

  1. To make your caddy “base,” help your child begin by laying your 9"x6" cardboard pieces on top of one another. Have your child use the glue stick to tack them together so they don’t slide. Together, both pieces of cardboard should make a solid, sturdy surface about ½” thick.
  2. Working together, you and your child will measure and cut a piece of contact paper 11"x14"—enough to cover the top of the cardboard base with extra to wrap around the edges securely. Once you've measured and cut your piece of contact paper, have your child stick it on and wrap it around the edges.
  3. Now pull out your three tin cans, and again measure and cut some more blue contact paper. This time, you’ll cut a flat rectangle to wrap around each can, big enough to completely cover the surface of the can, excluding the top and bottom. Help your child wrap it around the outside of the can. (Note: Your child can use red or white contact paper on the cans if they prefer, or they can make each can a different color: red, white, and blue!)
  4. Once the tin cans are wrapped, your child can decorate the outside of them with the silver stickers they have selected. 
  5. Use the ruler to measure 5” down from the top (the side that opens and closes) of your cereal box and make a line at that 5" mark that goes all the way around the outside of the box, making a 5" thick band at the top.
  6. Cut along the line, all the way around the box so that the cereal box is now shorter and has one end completely open with the other end (the bottom) completely closed.
  7. Use your red contact paper to wrap and cover the open-topped box on all sides, even on the inside! The contact paper helps to reinforce the edges of the cereal box while also adding a decorative touch. You and your child can do this part together.
  8. After you've completely covered the box, your child can decorate the outside with stripes of white contact paper for a patriotic theme. But this is just a suggestion: Children can decorate the cereal box however they like, adding blue stripes, white stars, or silver stickers.
  9. To assemble the caddy, line up the cereal box along the long edge of the blue cardboard base, and then place the three wrapped tin cans in a row on the base beside the box. Glue all of the elements to the base with the glue gun.
  10. When you’re done, you’ll have a handy Fourth of July picnic caddy for spoons, knives, forks, napkins.

Add to collection

Create new collection

Create new collection

New Collection

0

New Collection

0 items